
There is something exceptionally satisfying about landing a touch on one’s opponent and having it stick as if dueling with sharps. Rather than a button skipping off-target when landed with a glancing angle, there can be no question about the validity of a touch when your tip grabs its target as if it were exposed flesh on the dueling grounds at dawn.
How can this degree of realism be achieved within the relative safety of the salle? In lieu of a rubber button, one mounts his or her dueling sword with a point d’arrêt (pronounced “pwan de-ray” — literally meaning stop-point), and duels with the added protection of a manchette on the weapon arm.

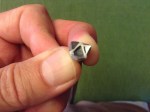
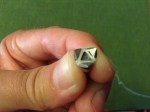
Points d’arrêt are forward-facing, sharp metal teeth mounted on the nail-head of a dueling sword.
What exactly are points d’arrêt? They are a trio of sharpened, forward-facing metal teeth mounted on the nail-head of an épée (dueling sword). When one or more of the teeth land on the intended target, the teeth hold fast to the fabric. Given the use of sharpened teeth, it is essential that a sacrificial manchette protect the entire weapon arm — the nearest target. This also plays into the psychology of dueling with points d’arrêt; the sharp teeth make one immediately aware of the risk faced with sharps, and the prudent fencer shifts mainly to the forward targets of the hand and forearm to reduce one’s own target exposure to your opponent’s point d’arrêt.
Given the relative rarity of classical fencing compared to sport fencing, the use of point d’arrêt with dueling épée is quite a rare occurrence, and their manufacture even more rare. Rockwell Classical Fencing does produce them. However, in the interest of historic preservation and education, the aim of this post is to illustrate how I manufacture points d’arrêt with basic workshop tools. I have done so by following the gracious advice and techniques given to me by master swordcutler, Dennis Graves of No Quarter Arms. His manufacturing techniques are elaborated upon and illustrated here with his permission — and with my sincere thanks.
A Disclaimer
The manufacture and use of point d’arrêt presents an elevated level of risk of damage to fencing jackets and gloves, and an elevated risk of accidental physical harm. One should never use point d’arrêt against an opponent without protective gear in addition to standard fencing equipment, including protective manchettes. What is contained herein is how and what I do. Any choice to follow the steps illustrated here to manufacture, mount, or to use points d’arrêt are done at your own risk.
Tools & Materials for Manufacture
- Bench Vice
- Drill Press (or stout drill and means to securely clamp it)
- Grinding Belt
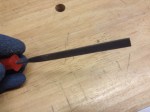
- 6-inch 3-square smooth-cut file
- 3 1/2″ flat smooth-cut file
- 8 or 10-inch smooth-cut flat file (helpful, but not necessary)
- Hacksaw
- 1/4″ 20 x 1″ Allen-head Capscrews
The capscrews are heavy modified and formed into points d’arrêt. Plan on extras since you will likely use a couple to get the procedure and your technique honed.
For an enlarged view of each step to create point d’arrêt, click on any photograph in the two galleries below.
-

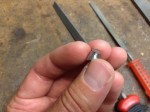
- 6-inch 3-square smooth-cut file is used to rough-out the points.
-
- 3 1/2″ smooth-cut file is used to finalize the points and sharpen them.
-
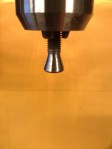
- 1/4″ 20 x 1″ Capscrew serves as the basis for modification into a point d’arret.
-

- 1/4″ 20 x 1″ Capscrew serves as the basis for modification into a point d’arret.
-

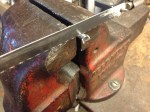
- The capscrew is chucked into a drill press for shaping.
-
- A grinding belt is used to shape the cap into a reverse cone.
-
- Using a vice and a 3-square file, three equidistant slots are cut into the cap almost to the base of the Allen-socket.
-
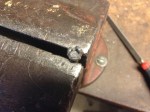
- Using a vice and a 3-square file, three equidistant slots are cut into the cap almost to the base of the Allen-socket.
-
- The slots are gradually and uniformly widened without cutting deeper.
-
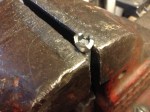
- Using two sides of the 3-square file, the slots are widened to form three uniform points.
-
- Using a 3 1/2″ smooth-cut flat file, the points’ shape are uniformly finalized and sharpened.
-
- The point d’arrêt is almost completed.
-
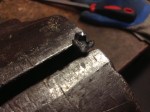
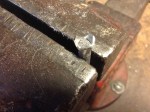
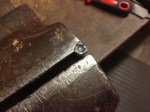
- After the points are finalized and sharped, the altered capscrew is mounted horizontally in a vice and a hacksaw is used to separate the points from the threaded shank of the capscrew.
-
- The points are sawed off of the threads.
-

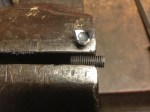
- The base of the point d’arrêt is filed flat to smooth the kerf.
-
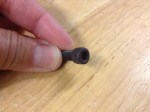
- This shows the smoothly filed base of the point d’arrêt.
-

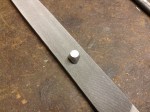
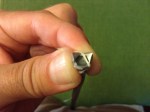
- The point d’arrêt is ready to be mounted.
-
- The bottom of the point d’arrêt, ready to be mounted to a blade’s nailhead.
In addition to illustrating the manufacture of points d’arrêt, I have also attempt to illustrate how I mount them to an épée’s nail head. My mounting process is based on the very little I have been able to find published on the web, my tying and lashing experience, and the advice of Scott “Doc” Lucchese, CCF’s Médecin de Salle.
-
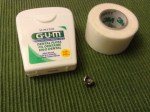
- Waxed dental floss (regular, not teflon type) and a bit of medical tape are used to mount the point d’arrêt.
-

- The nailhead of the blade must be checked for squareness to the blade’s spine, and the edge of the nailhead must not be sharp. Approximately 5-6 feet of floss is used to tie on the points, doubled and secured with a lark’s head knot.
-
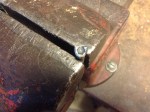
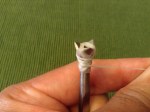
- The point d’arrêt is aligned so that one point coincides with the blade’s spine. The doubled floss is wrapped around the blade below the nailhead, then carefully looped over one point, then around the base a full turn.
-
- Following the loop over the first tooth and a full turn below the nailhead, the floss is looped over the second tooth, then again wrapped around the base below the nailhead, with the wraps in the same direction.
-
- Likewise, the thread is looped over the third tooth and around the base a full turn. Check to make sure one tooth is still aligned with the spine of the blade. This procedure is repeated until at least three passes (of doubled floss) is completed over each tooth.
-
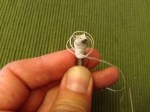
- After each tooth has been wrapped multiple times, wrap around the base to tighten and strengthen the assembly.
-
- With a few inches of floss remaining, tie off the wrappings with a half-hitch and…
-
- Tie at least three half-hitches, then clip the remaining thread.
-

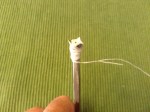
- The mounted points are nearly complete.

As always, your feedback and/or advice would be welcomed either by submitting comments to this post below or via the Columbia Classical Fencing page on Facebook.

Great article,do you have a recipe for the ink used with these points?
I do not, but I will ask around and let you know. We use the points merely to grab the manchette, and they work quite nicely for that.
After doing some research, it would appear that phenolphthalein was used. A diluted basic paste was daubed onto the tip, showing color when landing a hit. The color can apparently be removed by applying an acid, such as daubing with white vinegar. Caveat emptor: I have not tested this.
Thank you.
I found the entire post fascinating.
While trying to explain our latest chapter to my mother I received a suggestion.
A drop of rubber cement on the point of the blade might hold the point d’arrêt in place and create a non-permanent bond while securing it with string or floss.
I have not yet tested this idea.
I would expect that it would help position the point when first tying them onto a nailhead. After tying a few one, one becomes able to steady the point until a few loops secure the teeth.